Showing posts sorted by relevance for query garden structures. Sort by date Show all posts

Friday, March 05, 2010

fences: what works best for garden plots?

garden fence 043 garden fence 042
garden fence 032 garden fence 036
garden fence 027 garden fence 008
I like the looks of all the different fences in our community garden, though many are worse for the wear after the winter. Since we will be adding a bunch of new plots, the question comes up of how to fence these.

- Leave it to each gardener
- Town fences the plots with standard fencing
- Town provides fence materials to gardeners

A fence to surround a 20 x 20 ft plot gets to be expensive. Five ft tall fencing costs at least $50 for a 50 ft roll at Home Depot. Posts and gate materials add a lot more $$. This cost can make large plots very expensive for new gardeners. And installing a fence is heavy work - too heavy for many would be gardeners.

We have about every vegetable eating critter you can imagine. Hundreds of rabbits, chipmunks, woodchucks. Moles and mice. Deer, wild turkeys, etc. Some critters dig, others climb, baby rabbits can fit through incredibly small holes in fences. I've seen gardeners get very disappointed and leave when their entire pea crop is eaten to the ground and they don't have the resources to erect a good fence.

From all the community gardens I've been to it appears there's most often a standardized, town-provided fence. Waltham Fields has chicken wire around each plot, Cambridge puts an external sturdy fence around the perimeter with a limited access gate then lets gardeners erect small internal fencing of their own choice. I've also heard of gardens where all fencing must be temporary and is removed each fall so the entire garden area can be tilled by large machinery in the spring.

garden fence 025

Town provided options gives a consistent and organized appearance. But they have their disadvantages. By allowing each gardener to erect their own fencing, we have all sorts of variety. From 3 foot to 6 foot structures. Rusty to polished. Barricades that exclude any critter remotely considering theft to open posts that line the edges.

Our gardens have grass paths between each plot. These provide buffer zones between personalities. They remind me of some poem of Frost's. "Good wide paths make good plot neighbors." If someone grows 6 ft tall corn, sunflowers or tomatoes, who would want to be adjacent at the north side? But those grassy paths require maintenance. And the more fences, the more potential structures for invasives to grow on.

With these thoughts in mind, our Community Garden is planning to add a few additional garden plots. A few more spaces, a few more happy gardeners....

garden fence 061 garden fence 054
garden fence 030 garden fence 006
garden fence 020

Sunday, November 01, 2009

a FANTASTIC book: Designing the New Kitchen Garden by J Bartley


I'm really enjoying reading this book. Every word. Its wonderful.

Who would have thought a book on designing the New Kitchen Garden would start way back with medieval gardens? And that garden history would be so fascinating? The drawings of courtyard gardens are detailed and beautiful. Jennifer Bartley is a wonderfully creative and inspiring writer.

I'm enjoying the lists of plants grown in different types of gardens. Medicinals and herbals from monastery plots. Always ready for new (and old!) ideas for next year's garden, I'm imagining an officinalis section with borage, hyssop, lavender, lemon balm and rosemary.

I love the lessons Bartley brings - "that our garden would be a source of pleasure and healing to those that visit us." And the gardener of course. The possibility of balancing spirit, soul and body by nurturing an oasis that provides beauty, a haven of restfulness and fresh authentic food. Of the garden as a "workshop". Of the potager not as a plot hidden in the corner of the backyard, but as a central feature, an all-season landscape. Herbs, vegetable and flowers even in the front yard of the most exclusive neighborhood.

Bartley's photos are beautiful: rhubarb grown to blanch in tall willow baskets with nasturtiums trailing over the edges. Old espaliered fruit trees next to young rows of greens. Companions, structures, plans and lists. I may read this five or six times. It is a rich and full book for gardening at many levels. Outlined guidelines, garden principles, plants list and diagrams. A true inspiration for the new potager.

Designing the New Kitchen Garden: An American Potager Handbook by Jennifer Bartley


Thanks to Timber Books for sending me a free copy of this book for review.

Monday, May 26, 2008

garden mailbox

skippy's mailbox
garden with mailbox box
For Mother's Day my son made me a mailbox for my community plot garden! Its beautiful. Metal flashing on the roof, a wood peg to secure the door. "Skippy" is hand carved on the door, which opens with brass hinges. The community gardens have few identifiers for the plots - so this will be mine. And maybe I'll get mail some day.

garden structures

garden gifts

Thursday, June 05, 2008

new garden gate

gate
I have a great new garden gate that my husband made. Now I don't trip over the fence every time I try to get into the garden. I stepped on several plants this spring after I tripped on the fence. No more!

The gate is made from pvc pipe. It rests on either or both of 2 copper pipes set in the ground. It pulls up and off completely. Or it can be set on one pipe or the other so it swings. A very cool design.

The fence is just a low 2 or 3 foot one that keeps Skippy out of the garden.

garden structures

Friday, December 23, 2011

winter reading


The Edible Garden Magazine


I came across a fantastic gardening magazine yesterday in Barnes and Noble. Published in the UK. I am leafing through it - sipping a pear martini with Christmas music playing.....

I'm getting so many new ideas for next year that I need to jot down a list. The cold frame structures are wonderful - at least 6 or 8 are photographed. I will have to think about possibly bricking the edges of mine. And I am considering a bit of a boxwood edge along my stone path. I bet this would look nice all year round.

The magazine has lots of photos of small espaliered fruit trees, terracotta forcers that look beautiful in the garden, creative paths and garden layouts, chickens and bees, polytunnels, ads for beautiful British garden tools, ahhh......

Their month-by-month of garden chores says December is time to lift celeriac, leeks, sunchokes, and the Christmas lunch potatoes. Next month we should clean the pots and garden tools (I always skip this...). In a cold greenhouse, sow leeks, broad beans, peas, lettuce. Under fleece, sow carrots and spinach. I think the British climate is milder than New England, but I always like to give new things a try. Soon the sun will be hitting my cold frame again and I bet early peas and broad beans would do well.

Midwinter is the perfect time for garden magazines.

Wednesday, March 28, 2007

my irrigation system

P3270015 P3270011
Well, you could almost call this garden work ... even though it only took about 5 minutes.

The first step in turning over my garden in the spring is to pull up my irrigation system and move it out of the way. The tubing mostly came out fine, but there is one area that is stuck in the ground. Frozen. It seems that the soil is still frozen down about 5-6 inches deep. In most areas my irrigation tubes are in the top inch or two of soil, but in the one area they are a bit deeper. I guess I'll just have to wait a few days until it thaws. I wouldn't be able to turn the soil anyway if its still frozen underneath.

Here's some information on my irrigation system: It was professionally installed about 4 years ago and is a grid of about 1/2 inch ID tubes that connect to my outdoor water and are controlled by a computerized panel inside. I have been very happy with the system. It saves me a lot of time (instead of hand watering as I used to do) and has been easy to maintain (the only maintenance is once in the fall year the irrigation company winterizes the system by blowing the pipes dry with a big compressor). My guess is it reduces water use by delivering the water directly onto the soil.

garden structures

Saturday, June 07, 2008

I got mail!

mail
I received my first mail in my new garden mailbox that my son made for me. I gave some seeds to Victoria and she returned the extras in my mailbox. I knew it would come in handy!

garden structures
garden gifts

Monday, March 26, 2007

new fence

fence
I am experimenting with this new fence. I need a way to keep the dog out of the garden. Sorry Skip! It just doesn't work to have him using it as a litter box. I need a fence that I can easily step over. Also it shouldn't interfere with my sprinklers. This fence is 28 inches high and quite sturdy. I was able to get two of the four posts into the soil - its still a bit too frozen where the other two need to go. The fence is designed to keep small animals out of the garden (e.g. rabbits). I think I'll end up digging it into the ground a bit so its quite not so tall.

garden structures

Sunday, April 20, 2008

new fence - day 1

corner rocks tie wraps
posts
My new community garden fence is looking good. I had super helpers. We bought posts, fencing and door materials, moved rocks from the perimeter, pounded in posts and attached the fencing all around using tie wraps. Its a green vinyl coated fence with 2 by 3 inch openings. 5 feet high. I'll dig in chicken wire about 4 inches deep and 1.5 feet tall all around the bottom later. (This is because of the very aggressive woodchucks all the gardeners tell stories about.) The door posts are 4 by 4 inch pine posts. My husband is making a door today. Its going to look really nice.....

garden structures

Wednesday, March 26, 2008

raised bed design and construction

aerial
side corner3 corner2
While I wait for more sprouts and planting, I'm posting some information on my raised beds.

My husband made the beds about 10 years ago from boards of 2x6 pressure treated lumber (oops! Don't use pressure treated lumber for your gardens, although the newer types may be safe. I'll add a link soon about the hazards of this in gardens). They measure 3.8 ft by 9 ft. I have five adjacent beds. Between each is a pathway that ranges from 15 to 17 inches wide, but you might want to make them wide enough for your rake (I use an adjustable rake).

To make the beds, my husband just laid the wood on the surface of ground. He made stakes (about 2x2x12) that were pounded into 3 of the 4 corners of each bed. The frame is screwed into these stakes. The stakes hold the beds in place.

After making the frames, we filled them with about 3 or 4 inches of a mixture of peat, composted manure and topsoil. All were purchased in bags. I turned this mixture to mix it with the soil below. As I remember, it took me a few years to get the beds full to the top - they hold a lot of soil.

I have a nice composting system where I compost most of my garden waste. Every year a good amount of this goes into the beds and is turned under along with the cover crop that I've planted for the winter.

The raised beds work great and look nice. Well, most of the year they look nice - right now they are quite a mess....
skip aerial2

garden structures

Monday, April 21, 2008

fence day 2

fence
gate fenced plot
chicken wire aerial fence
The fence is pretty much done. I need to add chicken wire at the bottom to the last two sides, fill in the dirt along the outside bottom, then move the rocks up against the fence to make more room for plants.

garden structures

Monday, October 10, 2016

how I make and use pole and string tomato supports

tomato supports IMG_5821
tomato supports IMG_5878

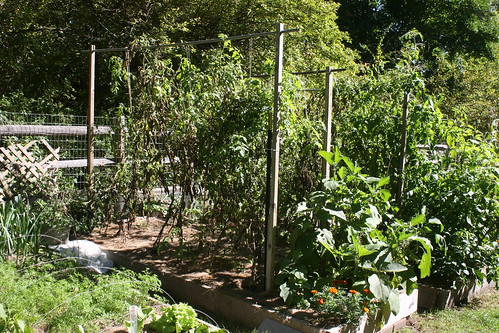
The season is fading and I can see my garden structures again. My husband designed these tomato supports for me and I've used then probably 10 years now. I used to make tepees out of 10-ft 1x1 inch poles. That worked OK, but poles and string are less work, support the vines better, and give better air flow. Here's what I do to set up and use pole and string tomato supports.

Side support materials:
Two 5-ft metal fence poles
Two 8-ft wood posts, 2x3 in, with a hole in the top that fits the cross pole that will be used
Post driver
Zip ties

Cross pole:
One 10-ft metal pipe (copper or galvanized)

Tomato support materials:
Twine and scissors

Setting up the supports:
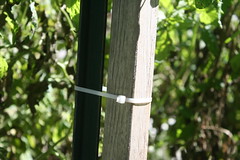
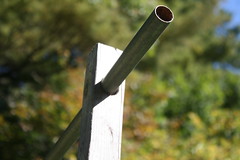
First, I firmly pound the fence poles into the soil using the post driver. I place them about 9-ft from each other, so the metal cross pole will be well supported and there will be a bit of overhang. Then to each fence pole I attach the wood post with the hole in the top making sure that the holes are set up so the pole can go through them. I used to attach them with screws and bolts, but I've gotten lazy and just use zip ties now. Once the end posts are up and are very solid in the ground, I run the long metal pipe through the holes at the top.

Supporting a tomato vine:
Space plants about 12 inches apart. I usually plant 5 tomato plants below each 10-ft pole. Lay out and plant the seedlings with even spacing. While they are still small seedlings, I usually support the plants by tying them to small sticks. When the plants are about 1-2 ft high, I tie them to the top pole. To do this: I run out enough twine to go from the ground, up and over the pole, and then down to the ground again. Add some extra. I spiral the two pieces of twine around the plant down to it's base then tie it to the stem. To tie it, I choose a sturdy location of the stem, preferably below the lowest leaf. Tie a bow knot in the two strands of twine to hold them together. Then use the two ends to wrap around the tomato stem a few times and secure them with a double knot. That's it. Repeat this for all of the plants.

Caring for the vines:
For plants on pole supports, it's best to pick off suckers so the vines stay tall and don't grow into adjacent plants. I gradually remove the bottom leaves as they turn yellow. This gives the plants more airflow. It's best to water from below and keep water off the leaves to reduce the spread of fungal diseases. As the vines grow, wind them with the string. Check on the tie at the bottom of the plant. If it becomes constricting, replace it with a looser knot. Sometimes a second string is need for extra support of the vine if you have a particularly heavy crop of fruit.

tomato supports IMG_5882 tomato supports IMG_5880

Sunday, May 23, 2010

tomato supports

tomatoes at community garden

There are several good options for supporting tomatoes.

If you have lots of space, want to minimize your work, and aren't too worried about the fungal pests that will come if we have another wet summer, you probably want to use the standard round metal tomato supports. With these, you don't need to do any work - just push them in around the plants and let the vines grow how they will. These will keep the plants off the ground so you can walk around them and pick the fruits easily. I've also seen people plant 3 or 4 tomato plants inside an old tire filled with good soil and a ring of metal fencing that you can get your hand through.

But if you have limited space and/or are concerned about fungi, its best to train the plant upward and prune excess growth. I have used tepees with good results for many years. To make tomato tepees, cut a 10ft 2x4 into 1x1 poles and use twine to secure groups of 4. Plant one tomato at the base of each pole and, as the plants grow, remove all sucker growth. Use commercial velcro plant ties or strips cut from plastic bags to secure the vines to the poles.

The past two years I have used a metal crosspole and twine to support my tomatoes. It seems the easiest method to me. To set up, make your end posts from wood and about 6 or 7 feet tall (you need to be able to reach the top it easily). These will support a metal cross pole. My cross poles are about 9 or 10 ft long - the length of my rows. To set up the structures, my husband pushed 3 foot metal fence supports into the ground and secured the wooden posts to these with large tie wraps. The metal pole is held in place by a hole near the top of the wood posts. To support the growing tomatoes, you just loop twin over the pole and tie it to the tomato plant - tie it to the stem at the bottom of the plant. You then wind the plant and twine as the plant grows (removing all suckers). Midway through the season, you may need to replace the twine, but mine lasted fine all year last year. I space my tomatoes plants about 12 inches, but 18 inches would be better.

Using the crosspole method, tomatoes plants are able to get lots of airflow in and around the plants. Also, the amount of sunlight each leaf gets is maximized. Tomato leaves without good sun exposure are prime candidates for fungal diseases. I'm sure hoping for a good tomato season this year!

tomato 1 tom's tomatoes
garden tomato plants tomatoes

Saturday, July 19, 2008

tomato supports

supports 9
supports 1 supports 3
supports 4
supports 5 supports 7
supports 6
supports 8 supports 11a
supports 11

While I was searching the community gardens for ripe tomatoes, I took pictures of all the different methods of supporting tomato vines that are in use in the plots. We have 100+ active lots now and its a great source of gardening information.

I think the best are the top photo. A traditional Italian design. (Its Gino's garden.) Simple. The wood posts hold the metal pipe and strings wrap around the vines. This is what I would like to try next year.

I always like the tepee structures too. The second large photo shows these. Someone has some very tall tepees. They look good. (They also have the white residue I assume is from spraying a fungicide.)

I can't quite figure out that the structure is in the third large photo. But the tomatoes seem happy.

Yes, those are my tomatoes in the last large photo. A rustic, make shift design. That's what happens when you start with tepees and then shift mid season to an upright design to let in more air and sun. Too much construction work. I'm looking forward to improving on this next year.


Belmont Victory Garden

tomatoes (Solanum lycopersicum)