My soil test results took just under two weeks to come back. I sent them the University of Massachusetts Soil Lab. Here's a previous post with more information.
I sent in three samples: 1-a new bed adjacent to my house, 2-my established home raised beds, and 3-my new community plot.
1-new bed adjacent to my house:
soil pH 6.4, buffer pH 6.6
nitrogen 13 ppm (add), phosphorus 22 ppm (sufficient), potassium 281 ppm (sufficient)
Micronutrient levels : all normal
Organic matter 16.6% (very high)
Lead: elevated
Recommendation: Adjust pH by adding 12 lbs lime per 100 sq ft. Add 1/4 lb nitrogen per 100 sq ft either as a complete fertilizer (e.g. 2-3 lbs 10-10-10 per 100 sq ft) or an alternate nitrogen source (e.g. 3-4 lbs dried blood 12-0-0 per 100 sq ft). For elevated lead, recommendations include grow only fruiting crops, grow ornamentals, remove a layer of soil and replenish with clean topsoil, use containers, create raised beds of at least 6 inches depth.
2-my established home raised beds:
soil pH 6.7, buffer pH 6.8
nitrogen 11 ppm (add), phosphorus 28 ppm (sufficient), potassium 116 ppm (sufficient)
Micronutrient levels : all normal
Organic matter 11.2% (very high)
Lead: low
Recommendation: Add 1/4 lb nitrogen per 100 sq ft either as a complete fertilizer (e.g. 2-3 lbs 10-10-10 per 100 sq ft) or an alternate nitrogen source (e.g. 3-4 lbs dried blood 12-0-0 per 100 sq ft).
3-my new community plot
soil pH 5.8, buffer pH 6.0
nitrogen 13 ppm (add), phosphorus 12 ppm (sufficient), potassium 157 ppm (sufficient)
Micronutrient levels : all normal
Organic matter 13% (very high)
Lead: low
Recommendation: Adjust pH by adding 20 lbs lime per 100 sq ft immediately, add an additional 13 lbs lime per 100 sq ft in small applications over successive tillings in the spring and fall. Add 1/4 lb nitrogen and 1/4 phosphorus per 100 sq ft either as a complete fertilizer (e.g. 3-4 lbs 5-10-5 per 100 sq ft) or alternate nitrogen and phosphorus sources.
topic: soil
Showing posts sorted by relevance for query topic: soil. Sort by date Show all posts
Showing posts sorted by relevance for query topic: soil. Sort by date Show all posts
Saturday, April 26, 2008

Monday, March 24, 2008
soil test
Today I'll try to get some soil collected and start preparing it to send out for a soil test. I've never tested the bed adjacent to the house. Its important to check it for lead, as well as nutrients I may need to adjust.
I'll collect a small sample from 10 or 12 locations in the bed. They all get mixed together in a bowl and I'll leave the bowl uncovered for a few days to dry out, stirring it now and then. Then one cup of the soil goes into a labeled zip-lock baggie and is sent out.
I was going to wait until I got my community plot assignment and do both at the same time. But since that's not until April 12, I think I'll go ahead with this bed now.
Here's a link to my last soil test results for my raised bed area (two years ago). Here's a link showing my baggie full of dirt from the last sample. I sent my sample to Dept of Plant and Soil Sciences at the University of Mass. Here's the brochure with collection instructions, prices and the mailing address. It was just over a week for the results to come back, if I remember right.
Like last time, I will have them do the Standard Soil Test w/ Organic Matter (option C) for $13.00 per sample.
topic: soil
Saturday, December 06, 2008
lasagna gardening

OK. Time to start thinking about next year's garden. Here's a photo of a plot at the Belmont Victory Gardens where the gardener does "lasagna gardening". (That's a thick layer of horse manure and wood chips on the top.)
I'm starting to feel guilty about tilling my garden and this was a big discussion topic during my Thanksgiving travels.
Here's are highlights from my quick research on the topic.
"Lasagna gardening is method of layering organic materials and compost right in the garden and then planting directly in these layers. Its a time saving organic gardening method developed by gardener and writer, Patricia Lanza, which requires no digging." Lasagna Gardening by Colleen Vanderlinden. At Amazon.com: Lasagna Gardening: A New Layering System for Bountiful Gardens: No Digging, No Tilling, No Weeding, No Kidding! by Patricia Lanza.
"A Japanese guy named Masanobu Fukuoka started the idea of no-til gardening/farming with his book One Straw Revolution. There was also an American woman called Ruth Stout and an Australian woman named Ester Deans who both promoted the idea in their day." (from a comment Patrick left me)
"To make a lasagna garden: stake out your garden site and begin building beds layer by layer. First layer is something heavy like thick newspaper or flattened cardboard to kill the existing grass. Next layer is 2-3 inches of water absorbent material like peat moss or coir. Next a 4-8 inch layer of compost. Another layer of coir or peat, and then yet another layer of organic material, like grass clippings on top of the coir, and on and on until the beds reach 18-24 inches high. Finally, the tops of the piles may be sprinkled lightly with bone meal and wood ash for added phosphorus and potassium. One of the greatest advantages to lasagna gardening is that you can layer your beds and plant your crops all in the same day. When you're planting a lasagna garden, no digging is required. For transplants, simply pull back the layers of mulch, drop in the plant and pull some mulching materials back over the roots. Sowing seeds is easy, too. Sprinkle a little finished compost over the area you want to plant, sow the seed, and cover it with a little more of the finished compost. Press down on the bed to secure the seeds and water thoroughly." An Introduction to Lasagna Gardening by Ellen Brown
I've always used old-fashioned cover-crop-and-till gardening methods, but was thinking of setting up a lasagna bed for comparison this year. My concerns are:
- Where do you get all that fresh organic material? I'm not going to go out and buy plastic bags full of peat.
- Why compost in my garden? I have a nice compost pile. I collect it all year and it'll be really nice this spring. Plus I have access to composted yard waste from the town.
- Why not grow a cover crop? Growing a legume crop a very efficient way to generate nitrogen. Cover crops require tilling in the spring and aren't compatible with no till methods.
- Why try to save time in the garden? Its only a small plot and some exercise is good.
- What if you don't have enough worms to mix the soil and poke holes in the layers? Layering is a perfect method of preventing water from reaching the lowers levels. Layered soil has the poorest drainage rate.
- And if its important that worms mix the soil, why not help them by turning it myself?
- Newspaper lying around the garden is not very attractive.....
- No-till methods may be important to prevent erosion in large fields, but for a tiny home plot on flat land, erosion is not an issue.
- How can you do a soil test on a lasagna plot? Which layer would you sample?
I seem to be talking myself out of this method here. Maybe I'll stay pro-till another year.
topic: soil
Tuesday, January 20, 2009
new gardens - new beginnings
I always love to hear from people starting a new vegetable garden. What a wonderful thing. And on this Inauguration Day, a day of such hopeful new beginnings, it seems a particularly appropriate topic.
I was asked to post information on starting a garden. How-to information. But it also gives me a chance to reminisce. And to follow my newly expanded community garden space this season.
I'll put a new link on my sidebar "For New Vegetable Gardeners".
To reminisce a bit, I started helping my Dad in his gardens more than 30 years ago. I remember the vegetable gardens he started back in 1972. He marked out plots with string and then turned the lawn over. I remember strawberries and awesome tomatoes. I wish I had photos.
I grew my own first garden outside our first apartment in a small plot our landlord let us use. There were three nice gardens in back yards very close together and I'd look across the fences to see what was growing. One of the gardeners was an older Italian man who knew what he was doing. I'd admire his tomato supports, tall tomato plants and heavy bearing peppers.
17 years ago we turned over our side lawn within a week or two of buying our first house. For many years, the vegetable garden doubled as a children's play area (mud puddle) in spring. Later we put in raised beds. (Someday I'll write down more of my garden memories..... Maybe I'll even find those old photos I know are around here somewhere....)
Last year I got my first community garden plot and this year I have a large area of newly claimed garden area to fill with vegetables.
One of my favorite video clips is this one showing a new vegetable garden: from turning the lawn to harvesting the tomatoes. Its fantastic. Its part of the proposal for an edible garden on the White House lawn. We'll see if the new President joins the ranks of new gardeners.
Many Presidents have been gardeners. I just read a nice article at Dave's Garden about Presidential Gardens. The article has a photo of one of my favorite gardens - a fantastic garden kitchen at Jefferson's home in Monticello. Talk about inspirational!
One of the gardens that has been a big inspiration for me is the WGBH Victory Gardens. Especially the photos in the Victory Garden Cookbook by Marion Morash. Here's the photo from the back cover of the book:

I always imagine I would have so much space, and such a neat and organized garden. And so much color!
Steps for starting a new vegetable garden
1- Identify where your garden will be. The main thing needed is sunlight. The more the better. Also a flat spot and a way to get water to the plants. Lots of different types of spaces work for edible gardens, including balconies, patios, front yards, back yards, containers, raised beds, etc. I love to see vegetable plants scattered among shrubs and flowers in a perennial area. And don't forget to consider a community garden. Here's a link to find the community garden closest to you.
2- Check the soil. If there's any chance of lead or other contaminants, do a soil test. Here's where I send my soil for testing. Even aside from lead, the soil test will tell you exactly how much organic matter, nutrients and lime you should add to the soil.
3- Make a list of the vegetables you'd like to grow. As a suggestion, start with five vegetables: e.g. peas, green beans, tomatoes, cucumbers and zucchini squash. Potatoes also work well for getting the soil mixed in a new garden. Learn about culture of these vegetables. Pea seeds should be planted outside as soon as the soil thaws (March or April), beans seeds also should be planted directly in the garden but after all danger of frost is past (May or June). You can buy young seedlings of tomatoes, cucumbers and zucchinis and transplant these into your garden.
4- Make a plan. You can do this with pencil and paper, on the computer
(try: Google SketchUp, Gliffy, I use MS Office PowerPoint)
or in your head, but its good to have a sense of what you plan to plant, how many plants and where they will be. Here are some of my plans.
5- Prepare the soil. Patrick has a great post on turning a lawn into a garden.
This can be a big topic. For a first year, I'd say to turn the soil (with a shovel) to loosen it. Optimally, you want to spread 2 inches of compost, along with lime and fertilizer, and then turn it again to mix. If you've done a soil test, the results will tell you exactly what and how much you need to add. And it will list organic and conventional sources.
6- Then plant!
7- Tend.
8- Harvest.
9- And repeat. (The following year you may want to try more vegetables, no-till soil preparation, raised beds, or lots of other fun stuff.)
There are innumerable details to fill in. Let me know what topics are most useful for new gardeners. Or leave a comment on your new garden plans.
There are many good sites on line about starting a vegetable garden. Most University Extension schools have very informative sites. Here are some:
Iowa State Extension
Univ of Minnesota Extention
Cornell University Vegetable Gardening Basics
But one of my favorite sources is Bifurcated Carrots. Check out this post for more information.
Here's how my new community garden plot looked early last spring and, at the right, how my newly expanded space looked this fall. I feel such hope, promise and joy in a fresh plot of dirt. Big dreams. Newness.


I was asked to post information on starting a garden. How-to information. But it also gives me a chance to reminisce. And to follow my newly expanded community garden space this season.
I'll put a new link on my sidebar "For New Vegetable Gardeners".
To reminisce a bit, I started helping my Dad in his gardens more than 30 years ago. I remember the vegetable gardens he started back in 1972. He marked out plots with string and then turned the lawn over. I remember strawberries and awesome tomatoes. I wish I had photos.
I grew my own first garden outside our first apartment in a small plot our landlord let us use. There were three nice gardens in back yards very close together and I'd look across the fences to see what was growing. One of the gardeners was an older Italian man who knew what he was doing. I'd admire his tomato supports, tall tomato plants and heavy bearing peppers.
17 years ago we turned over our side lawn within a week or two of buying our first house. For many years, the vegetable garden doubled as a children's play area (mud puddle) in spring. Later we put in raised beds. (Someday I'll write down more of my garden memories..... Maybe I'll even find those old photos I know are around here somewhere....)
Last year I got my first community garden plot and this year I have a large area of newly claimed garden area to fill with vegetables.
One of my favorite video clips is this one showing a new vegetable garden: from turning the lawn to harvesting the tomatoes. Its fantastic. Its part of the proposal for an edible garden on the White House lawn. We'll see if the new President joins the ranks of new gardeners.
Many Presidents have been gardeners. I just read a nice article at Dave's Garden about Presidential Gardens. The article has a photo of one of my favorite gardens - a fantastic garden kitchen at Jefferson's home in Monticello. Talk about inspirational!
One of the gardens that has been a big inspiration for me is the WGBH Victory Gardens. Especially the photos in the Victory Garden Cookbook by Marion Morash. Here's the photo from the back cover of the book:
I always imagine I would have so much space, and such a neat and organized garden. And so much color!
Steps for starting a new vegetable garden
1- Identify where your garden will be. The main thing needed is sunlight. The more the better. Also a flat spot and a way to get water to the plants. Lots of different types of spaces work for edible gardens, including balconies, patios, front yards, back yards, containers, raised beds, etc. I love to see vegetable plants scattered among shrubs and flowers in a perennial area. And don't forget to consider a community garden. Here's a link to find the community garden closest to you.
2- Check the soil. If there's any chance of lead or other contaminants, do a soil test. Here's where I send my soil for testing. Even aside from lead, the soil test will tell you exactly how much organic matter, nutrients and lime you should add to the soil.
3- Make a list of the vegetables you'd like to grow. As a suggestion, start with five vegetables: e.g. peas, green beans, tomatoes, cucumbers and zucchini squash. Potatoes also work well for getting the soil mixed in a new garden. Learn about culture of these vegetables. Pea seeds should be planted outside as soon as the soil thaws (March or April), beans seeds also should be planted directly in the garden but after all danger of frost is past (May or June). You can buy young seedlings of tomatoes, cucumbers and zucchinis and transplant these into your garden.
4- Make a plan. You can do this with pencil and paper, on the computer
(try: Google SketchUp, Gliffy, I use MS Office PowerPoint)
or in your head, but its good to have a sense of what you plan to plant, how many plants and where they will be. Here are some of my plans.
5- Prepare the soil. Patrick has a great post on turning a lawn into a garden.
This can be a big topic. For a first year, I'd say to turn the soil (with a shovel) to loosen it. Optimally, you want to spread 2 inches of compost, along with lime and fertilizer, and then turn it again to mix. If you've done a soil test, the results will tell you exactly what and how much you need to add. And it will list organic and conventional sources.
6- Then plant!
7- Tend.
8- Harvest.
9- And repeat. (The following year you may want to try more vegetables, no-till soil preparation, raised beds, or lots of other fun stuff.)
There are innumerable details to fill in. Let me know what topics are most useful for new gardeners. Or leave a comment on your new garden plans.
There are many good sites on line about starting a vegetable garden. Most University Extension schools have very informative sites. Here are some:
Iowa State Extension
Univ of Minnesota Extention
Cornell University Vegetable Gardening Basics
But one of my favorite sources is Bifurcated Carrots. Check out this post for more information.
Here's how my new community garden plot looked early last spring and, at the right, how my newly expanded space looked this fall. I feel such hope, promise and joy in a fresh plot of dirt. Big dreams. Newness.
Thursday, April 10, 2008
turning the soil of my raised beds

My spring routine is to turn the soil of my garden beds. Today I turned three of my beds. I use a standard garden shovel and flip the soil over onto itself - the way my dad showed me years ago. If I have a cover crop, this gets turned under. This year I have a light cover of winter ryegrass. I like the wait a week or so, but sometimes right away, I smooth the soil level with the backside of a metal rake. Finally my irrigation lines get buried and the beds are ready to plant.
Tomorrow the skies are forecast to cloud over and rain is scheduled for the weekend. Once it clouds up, I plan to transplant my broccoli, kale, onions, endive and some lettuce seedlings into the garden. Exciting! My first garden transplants of the year. My pea sprouts are doing well and if I have time, I'll sow another row or two of pea seeds. Another sign that spring is here is that there is an endless amount of garden work now.
To turn or not to turn? I've recently heard that turning ruins the structure of the soil. I'll have to read more about this. To me, turning mixes in the cover crop, aerates the soil, and is a spring activity I look forward to. With only 360 sq ft, it doesn't take very long. Afterwards I feel like I've done some real work. I can throw my clothes in the wash, eat and sleep well, and look forward to planting.
topic: soil
sure signs of spring
Wednesday, April 04, 2007
cold soil


These are photos of my garden this morning on the left and this afternoon on the right. Our weather is having a problem. Not really snow, its slush.
This morning I checked my soil temperature. 36F in one area, 40F in another. Bbbrrr. I've read that peas shouldn't go in until the soil temperature is 50F! So I'm trying to be patient. Yesterday I turned the soil in one bed, where the peas will go. It is still frozen down at about 6-8 inches. It felt like my shovel kept hitting a big rock. I think my garden is slow to warm up because it gets alot of midday shade from the house next door (to the south). Its not a problem later in the season when the sun is higher, but I suppose this is what's going on now.
topic: soil
Saturday, April 28, 2007
inoculant
A fellow garden blogger (Patrick at Bifurcated Carrots) recommended I try inoculant for my peas and beans this year. Last year I had a miserable crop of both and was ready to give up, on the peas at least. But, here I am, giving it one more try. This year with inoculant. Its the first time I've ever used this, so I did some research.
The inoculant I used is garden combination inoculant from Johnny's Selected Seeds, called N-Dure. It contains a mix of rhizobium bacteria: rhizobium leguminosarum viccae, rhizobium leguminosarum phaseoli, and bradyrhizobium sp.
Bradyrhizobium sp. treats lima beans, rhizobium leguminosarum viccae treats fava beans and garden peas, and rhizobium leguminosarum phaseoli treat dry beans and string beans. I don't think this mix includes the bacterium needed by soybeans (bradyrhizobium japonicum), but I will use it with my soybeans anyway in case it helps. Here's a chart for what treats what.
What's inoculant? Here's some excerpts from an informative fact sheet: "The ability of legumes to 'fix' nitrogen depends on the presence of special soil bacteria, known
as rhizobia, which invade the roots of legumes to form nodules. Within the nodules the bacteria convert, or fix, nitrogen from air pockets within the soil into forms useful to the legume plant. When the legume plant decays, the fixed nitrogen becomes available to subsequent crops. The fixed nitrogen is released slowly, often over a period of several years.
Each legume species has a specific rhizobial requirement. For example, rhizobia that infect medics are different from those that infect clover, peas or lupins. If the correct strain of rhizobia for a particular legume is absent in the soil or in very low numbers, effective nodulation will not occur and little, if any, nitrogen will be fixed. In this case the correct strain of rhizobia must be supplied at sowing. This process is known as inoculation.
Inoculation is essential when a legume crop or pasture plant is new to the land on which it is being sown. Once an effectively nodulated legume crop or pasture has been grown, and the rhizobia have been established in the soil, there is no need for inoculation with rhizobia in future seasons".
I've read that chlorinated water kills the inoculated rhizobia, so I'm hoping mine do OK. I had to water a few times last week using our chlorinated tap water. But generally, we've had good rainfall this spring. So far, my pea germination has been great!
Fabaceae
Pisum sativum
topic: soil
Thursday, April 26, 2007
compost!


These are my compost bins. It was a beautiful day for garden work, so today I opened up the bins and brought fresh compost to my squash bed. I used a pitch fork to shovel the uncomposted material from the top of one bin into the other bin. Then I shoveled the rich compost into a wheel barrow and brought 2 full barrows to my vegetable garden. I then moved all of the uncomposted material from the full bin into the newly emptied bin. At the bottom of this second bin is probably 3 barrows full of beautiful compost that I will use in a couple of weeks on my new tomato area.
My soil test results last year said I did not need any more compost in most of my garden. But it seems to me that squashes and pumpkins always prefer richer soil. Also, I will be starting a new tomato area next to the house where I have never amended the soil. I'm sure it will benefit from the rich compost.
My compost is mostly made from garden waste and leaves. I collect a very small amount of household vegetable waste occasionally that I add to the bins. Of course, there's the annual Halloween pumpkins that end up in the bins. Even with all this beautiful compost (all that my garden needs), still more than half of my garden waste goes to the local waste pick up.
topic: soil
my bins and systems for composting compost
Tuesday, April 15, 2008
soil samples sent
I just mailed out my soil samples. Just so I remember: sample 1 is from the new plot adjacent to my house, sample 2 is from my old raised beds, sample 3 is from my new community garden plot. I think its likely the soil adjacent to my house will be contaminated with lead and I will need to abandon this plot. We'll see. The results should be back in 1-2 weeks.
topic: soil
topic: soil
Sunday, November 05, 2006
soil test results
My soil test results came back. (Fast!) I can take it easy next year. All I need to add is nitrogen. Everything else is pretty high. I guess my organic matter is very high at 12.5% (4-10% is optimum). I don't even need to add lime.
Details: pH 6.6, buffer pH 6.7, nitrogen 22 ppm, organic matter 12.5%, phosphorus 33 ppm, poatssium 263 ppm, calcium 2292 ppm, magnesium 231 ppm, cation exchange capacity 21.5 Meq/100g, % base saturation K 4% Mg 11.2% Ca 67.4%, micronutrient levels all normal, lead (estimated total) 246 ppm (low).
S&P
topic: soil
Tuesday, October 24, 2006
soil sample and winter rye

 I mailed out a soil sample from my vegetable garden today for pH, nutrient, heavy metal and organic matter testing. I'm really interested to see how far off the nutrients are. Too much phoshate and low pH, I'm guessing. I also have a photo here of my winter rye sprouts. They're coming up fast.
topic: soil test
Thursday, April 14, 2016
sprouting my seed potatoes
I like to sprout my seed potatoes before I plant them. They're all sitting on my kitchen windowsill now. I'm looking at them and wondering: does a watched potato sprout? (silly...)
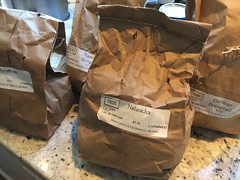
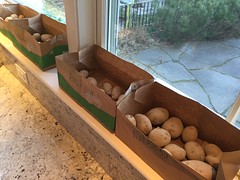
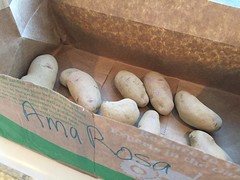
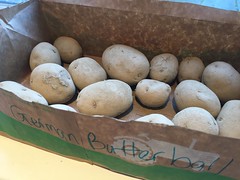
Potatoes are hardy enough to be planted outside now. One reason I'm sprouting them inside is I haven't prepared my potato beds yet. It's been chilly and I've been busy. But I have been researching how to prepare the beds. (They're at my community garden.) I looked up whether potatoes like a fertile soil and I found all sorts of different answers: some site say they're light feeders, others say heavy feeders! OK, so a Google advanced search of only .edu sites, voila!, they are heavy feeders. All the extension sites agree.
I didn't realize potatoes are heavy feeders and so I haven't given them much compost in the past. This year I want to put on a good 2 inches of compost. That means I'll need 1 cubic yd (27 cu ft). Compost is so expensive, especially when purchased by the bag. I think I'll bring compost from my home bins to my community garden. I've generated a lot of compost in the past year and I figure the effort to transport it is similar to transporting bags of compost. So that's on my to-do list next week.
At my Master Gardener class today, the speaker talked about SOIL. A great topic! The head of the soil testing lab at the Univ of Conn (Dawn Pettinelli) gave a super 5 hour soil course. She told us that pH is the most important parameter to keep track of in garden soils (drainage too). She mentioned that potato scab is one of the plant diseases affected by soil pH. (I hate digging up potatoes and finding them covered in scab.) She said that at a pH lower than 5.2, the scab pathogen won't grow (the potatoes will), so this is one approach to prevent scab. But if you lower the pH in your potato bed, it makes it hard to rotate plantings. So she said - grow resistant varieties. OK, I did select for scab resistance in the varieties I have this year. Hopefully I'll have scab-free potaotes this year.
Tuesday, September 23, 2008
winter cover crop

Ouch - my first mention of the word "winter"....
My cover crop is sprouting. Little bits of green between the wood chips and the garden tools. I pulled my beans and squashes, limed and planted cover seeds last week. I have a mix called "Fall Green Manure Mix" from Johnny's Selected Seeds. As Johnny's writes: "A mix of winter rye, field peas, ryegrass, crimson clover and hairy vetch. The peas, clover and ryegrass will winter kill to provide organic matter and soil cover. The hairy vetch and winter rye will regrow in the spring to provide nutrients for crops to utilize."
Most of my garden areas still have crops growing. I won't clear them until frost. In these areas I'll plant only the hardy winter rye.
topic: soil
Thursday, June 05, 2008
clover as a ground cover


I have a new crop of Crimson Clover. The leaves are very pretty after the rain. They collect the droplets like shiny jewels.
The clover is in the garden bed adjacent to my house. This bed has lead levels too high for vegetables. I had cleared the shrubbery from this area before testing the soil. I am planning to fill the bed slowly with flowering perennials and small bushes. In the mean time, I've planted clover. Soon it will bloom with flowers the bees should enjoy.
Scattered in the clover are a few seedlings of pumpkins, sunflowers, dahlias and some wildflowers I grew from seed this spring. There are also three large barrels that I planted with chiles and bell peppers. I'll plant bean seeds soon in a few window boxes along the edge.
chile and bell peppers (Capsicum)
topic: soil
Tuesday, October 16, 2007
blog action day: no garden pesticides
Blog Action Day October 15, 2007 is a network of posts relating to the environment.
My topic: What worked for me this year to avoid the use of pesticides in my kitchen garden

1. Row covers. My newly found triumph. They were easier than I thought and very effective in keeping the cabbage worms away (photos here).
2. Admit defeat. Black aphids ate my fava beans this year and I admitted failure and pulled them up (pictures of the favas and aphids are here). Soon after, the lady bugs arrived in force and I haven't seen another aphid all year (my lady bug photos are here).
3. Plant many varieties: My fava bean failure was a big disappointment, but since I had many other crops, it didn't matter so much that I lost one. I also had a problem with my green beans this year - probably a bean mosaic virus (pictures here). It affected my heirloom varieties that were not virus resistant. Since I had planted at least 6 or 8 different varieties of beans, including both heirloom and new varieties, I just pulled the affected plants and enjoyed the resistant ones.
4. Encourage birds. I don't know how much the birds really help by eating bugs, but I see them out in the garden every day - rain or shine - eating this and that. I mostly get house sparrows in the bird houses I've put up around the garden. Also robins, chickadees, cardinals, blue jays and house wrens. But I think they are a part of natural pest control.
5. Wrap squash stems with cheese cloth. I didn't have many stem borers in my squashes this year, which may in part be due to wrapping about half of my squash stems with cheese cloth. It looked ugly, but I have to admit that it seemed to work. In previous years, many of my squash and cucumber plants were killed mid year by borers. The plants suddenly wilt and die. Pesticides effective against borers are toxic to bees.
6. Rotate crops. A garden plan helps with this. Mid-winter is a good time to figure out where to move your crops to next year.
7. Get a soil test: A soil test will tell you if what applications of nitrogen and other nutrients are necessary to avoid problems that can occur as a result of stressed plants. I tested my soil late last fall and the results detailed a fertilization regime, organic matter additions and pH adjustments.
8. Irrigation: I highly recommend a built in easy and effective irrigation system for use during dry periods. I have a network of small PVC pipes that I lift to work the soil every spring and then bury prior to planting. (Here are pictures.) It works great. I have a computer controlled system that I use to irrigate early in the day. This promotes the drying of leaves and decreases pests that thrive in moist conditions. (Next year, my hope is to attach a rain barrel my irrigation system. What fun!)

My topic: What worked for me this year to avoid the use of pesticides in my kitchen garden
1. Row covers. My newly found triumph. They were easier than I thought and very effective in keeping the cabbage worms away (photos here).
2. Admit defeat. Black aphids ate my fava beans this year and I admitted failure and pulled them up (pictures of the favas and aphids are here). Soon after, the lady bugs arrived in force and I haven't seen another aphid all year (my lady bug photos are here).
3. Plant many varieties: My fava bean failure was a big disappointment, but since I had many other crops, it didn't matter so much that I lost one. I also had a problem with my green beans this year - probably a bean mosaic virus (pictures here). It affected my heirloom varieties that were not virus resistant. Since I had planted at least 6 or 8 different varieties of beans, including both heirloom and new varieties, I just pulled the affected plants and enjoyed the resistant ones.
4. Encourage birds. I don't know how much the birds really help by eating bugs, but I see them out in the garden every day - rain or shine - eating this and that. I mostly get house sparrows in the bird houses I've put up around the garden. Also robins, chickadees, cardinals, blue jays and house wrens. But I think they are a part of natural pest control.
5. Wrap squash stems with cheese cloth. I didn't have many stem borers in my squashes this year, which may in part be due to wrapping about half of my squash stems with cheese cloth. It looked ugly, but I have to admit that it seemed to work. In previous years, many of my squash and cucumber plants were killed mid year by borers. The plants suddenly wilt and die. Pesticides effective against borers are toxic to bees.
6. Rotate crops. A garden plan helps with this. Mid-winter is a good time to figure out where to move your crops to next year.
7. Get a soil test: A soil test will tell you if what applications of nitrogen and other nutrients are necessary to avoid problems that can occur as a result of stressed plants. I tested my soil late last fall and the results detailed a fertilization regime, organic matter additions and pH adjustments.
8. Irrigation: I highly recommend a built in easy and effective irrigation system for use during dry periods. I have a network of small PVC pipes that I lift to work the soil every spring and then bury prior to planting. (Here are pictures.) It works great. I have a computer controlled system that I use to irrigate early in the day. This promotes the drying of leaves and decreases pests that thrive in moist conditions. (Next year, my hope is to attach a rain barrel my irrigation system. What fun!)
Monday, November 03, 2008
thick cover of clover and rye

I'm pleased with the patch of green manure I planted early this fall. The clover and rye did very well though the field peas and vetch didn't do much. My later sowings (too late) did not sprout as well.
topic: soil
Sunday, October 05, 2008
winter cover crop

For a cover crop this year I am trying Johnny's winter green manure mix. It sounds like most of the nitrogen fixing components are cold sensitive and will winter kill (field peas and clover), while others (winter rye) are cold hardy. If the fall is mild, I'll get a good growth of the first group. If it gets cold soon, I'll just have the rye. I think vetch is a more cold hardy and also builds nitrogen. I'll keep and eye on these and see how they do.
I planted this same mix in my squash bed a few weeks ago and its sprouted nicely. But I ran out of seed and had to order more. I guess I spread seed thicker than recommended. I planted this entire 1 pound package on my new space (about 320 sq ft), while it was supposed to cover 1000 sq feet. I just spread it manually and hate the thought of not having enough.
I'll have to pick up some winter rye seed at my local True Value. Its pretty cheap seed. I'll use this for other spaces that I don't clear out until frost.
Here's a really good site with information on cover crops for the home garden (Oregon St Univ Extension).
topic: soil
Saturday, December 06, 2008
horse manure for the garden
I used horse manure in my garden recently but a fellow gardener suggested it was not so good as a compost or mulch. From what I read on line, it seems that there are several reasons to skip this manure as it contains weeds seeds, deworming drugs, herbicides and high Mg levels.
Ann's Organic Garden: Just say nay to horse manure for mulch, by Ann Lovejoy
topic: soil
Ann's Organic Garden: Just say nay to horse manure for mulch, by Ann Lovejoy
topic: soil
Sunday, November 26, 2006
a toast to the end of gardening season

I think this is about it for my vegetable garden this year. I have one tomato left from the big box of green tomatoes that I picked last month. Pretty much all of the green tomatoes ripened. Outside, I just have carrots, garlic sprouts and parsley left in the garden along with my cover crop of winter rye. We've had a couple of hard frosts and the garden soil is nearly frozen. I'll take a few pictures of the garden plot during the winter - and I am looking forward to planning next year's garden. But for now, here's a toast to a productive and enjoyable season. The beverage is one of my newly invented garden martini's - carrots, celery, cukes and olives!
Topic: martini!
Saturday, July 18, 2009
more on late blight
Late blight seem to be the only conversation topic I hear this week at our community gardens. I hear yelling from across the way about newly discovered dead tomato plants. I hear long technical discussions among groups of gardeners.
And everyone spends a fair amount of time walking around and looking at tomato and potato plants in other plots. People come by my plot to chat and they know whose plants look good and whose are dead. They remind me that I should be bagging and destroying the foliage so it doesn't infect everyone else's plants, which, of course are all already infected or dead or coated with fungicide.
And there are stories circulating about who has pulled everything, who won't pull anything, who's bagging and disposing, and, probably one about me just throwing my dead plants into my compost bin.
I heard someone dug up a whole row of potatoes that were just mush from blight.
I emailed the extension school yesterday to see if there any experts who could come talk to us. With so much interest, I think it would be a good way to get the gardeners together, though we can be an unruly bunch. We could have a nice relaxing coffee and donuts gathering, in a freshly mowed grassy area with beautiful mid summer flowers, singing birds, and listen to tomato gloom and doom stories....
An article on Late Blight is in yesterday's New York Times: "Outbreak of Fungus Threatens Tomato Crop" :
Some facts I've learned about late blight:
- Lat Blight was responsible for the Irish potato famine of the mid-19th century.
- It is one of the few plant diseases that can destroy an entire crop.
- The disease can wipe out entire tomato and potato fields within a week if conditions are wet.
- Late blight spores can travel over 40 miles under the right conditions.
- Powerful synthetic fungicides like chlorothalonil (not approved for organic farming) can protect unaffected plants from disease, but can't cure infected ones.
- Copper fungicides are officially listed as synthetics but organic certified farmers are allowed to use these after they have used all available alternative practices to manage late blight.
- Copper fungicides extend potato growing period by between 2-4 weeks.... estimated to result in 10 - 40% higher yields.
- Potato varieties with moderate levels of resistance include: Kennebec, Sebago, Allegany, and Rosa. Elba is currently the most resistant potato variety available.
- Few late blight resistant tomato varieties are available. The cultivar 'Legend' has some resistance, though not under high disease pressure. Some cherry tomato cultivars ('Red Cherry' and 'Sweetie') are more tolerant to late blight. 'Matt's Wild Cherry' is considered resistant.
- If late blight occurs when potatoes tubers have already 'sized up', harvest crop as soon as possible to avoid post-harvest tuber rot.
- Tubers become infected when spores wash down through the soil and come into contact with the potatoes. Tubers are not infected via their connection to plants with blighted foliage.
- Occasionally peppers and eggplants are mildly infected, as are a few nightshade weeds.
Fungicides for late blight on potatoes
Cornell University fact sheet on Late Blight
And everyone spends a fair amount of time walking around and looking at tomato and potato plants in other plots. People come by my plot to chat and they know whose plants look good and whose are dead. They remind me that I should be bagging and destroying the foliage so it doesn't infect everyone else's plants, which, of course are all already infected or dead or coated with fungicide.
And there are stories circulating about who has pulled everything, who won't pull anything, who's bagging and disposing, and, probably one about me just throwing my dead plants into my compost bin.
I heard someone dug up a whole row of potatoes that were just mush from blight.
I emailed the extension school yesterday to see if there any experts who could come talk to us. With so much interest, I think it would be a good way to get the gardeners together, though we can be an unruly bunch. We could have a nice relaxing coffee and donuts gathering, in a freshly mowed grassy area with beautiful mid summer flowers, singing birds, and listen to tomato gloom and doom stories....
An article on Late Blight is in yesterday's New York Times: "Outbreak of Fungus Threatens Tomato Crop" :
"A highly contagious fungus that destroys tomato plants has quickly spread to nearly every state in the Northeast and the mid-Atlantic, and the weather over the next week may determine ... whether tomato crops are ruined.... described as an “explosive” rate of infection.....William Fry, a professor of plant pathology at Cornell, said, “I’ve never seen this on such a wide scale.”
"The current outbreak is believed to have spread from plants in garden stores to backyard gardens and commercial fields.... Some growers are talking about $40 boxes already."
Some facts I've learned about late blight:
- Lat Blight was responsible for the Irish potato famine of the mid-19th century.
- It is one of the few plant diseases that can destroy an entire crop.
- The disease can wipe out entire tomato and potato fields within a week if conditions are wet.
- Late blight spores can travel over 40 miles under the right conditions.
- Powerful synthetic fungicides like chlorothalonil (not approved for organic farming) can protect unaffected plants from disease, but can't cure infected ones.
- Copper fungicides are officially listed as synthetics but organic certified farmers are allowed to use these after they have used all available alternative practices to manage late blight.
- Copper fungicides extend potato growing period by between 2-4 weeks.... estimated to result in 10 - 40% higher yields.
- Potato varieties with moderate levels of resistance include: Kennebec, Sebago, Allegany, and Rosa. Elba is currently the most resistant potato variety available.
- Few late blight resistant tomato varieties are available. The cultivar 'Legend' has some resistance, though not under high disease pressure. Some cherry tomato cultivars ('Red Cherry' and 'Sweetie') are more tolerant to late blight. 'Matt's Wild Cherry' is considered resistant.
- If late blight occurs when potatoes tubers have already 'sized up', harvest crop as soon as possible to avoid post-harvest tuber rot.
- Tubers become infected when spores wash down through the soil and come into contact with the potatoes. Tubers are not infected via their connection to plants with blighted foliage.
- Occasionally peppers and eggplants are mildly infected, as are a few nightshade weeds.
Fungicides for late blight on potatoes
Cornell University fact sheet on Late Blight
Subscribe to:
Posts (Atom)